Wednesday, October 28, 2009

“BOOOOOOO--EssenseVibez in the Houzeeee Again!”


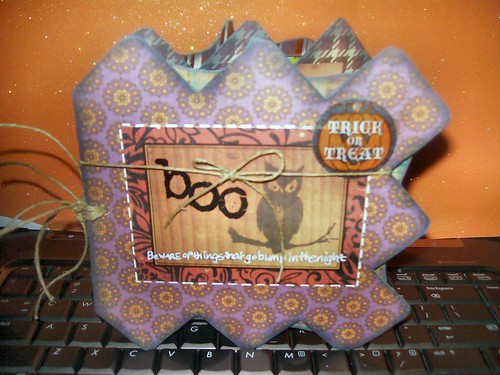
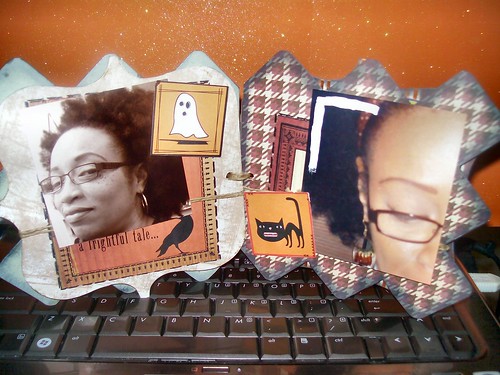
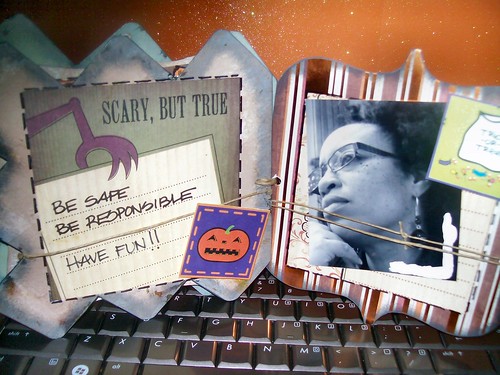
EssenseVibez in the housssssee!--and yes, it's my turn again to present a spooktacular project for you to enjoy--this minibook was designed for those who like to send grandparents or favorite Aunties Halloween/pumpkin patch photos---

I used various
Midnight Oil Perfectly Shaped chipboard pieces to build this book---I used patterned paper on one side of the chipboard and painted on the opposite sides of the pieces--Added cute lil' embellies with foam dots--Then added pictures and tied twine around the pieces and to hold the book together--


If you happen to make one of these books--We'd love to see it!


As always, if you’re interested in any of the MOSD products {which I know you are} go to the link located on the left sidebar and take a look at what they have to offer---Leave a comment and tell me what you think of my project—

Enjoy our other design team members creations as you peruse our blog--
Remain Blessed!!!


Tuesday, October 27, 2009

Awesome Sisters Mini Album

I had so much fun making this mini album that I want to give my sister as a gift. We don't see each other nearly as much as I'd like (you know, east coast-west coast living...). I can't wait to find the perfect pictures to complete the album. I used various sizes of the awesome chipboard shapes from MOSD. For the cover, I cut one in half so I could use it as an "open door" into the album.
I have displayed a few of the pages as the mini book opens. All in all, in addition to my cover, I used two 4 x 6 pages, one page with a scalloped edge, a page with a curved edge (kind of a "D" shape) and a 6 x 6 page for the back cover.
I was also happy to use some of my "stash" to decorate the book. I used various patterned papers I've had for a while, some Basic Grey Rub-ons, and some ribbon and flowers from my MOSD products. The "door knobs" on the front cover are from the dollar store. I believe they are supposed to be for jewelry making. I popped some small buttons on the front cover and covered them with the decorative metal pieces to make my "door knobs".
Oh yes, I also used one of the "clearly stated" quotes from my MOSD products, too.
Thanks for visiting and have a MOST WONDERFUL day!
Lori

Sunday, October 25, 2009

MOSD Meets Grunge...

Grunge board and grunge paper that is! I love Tim Holtz inks and grungeboard and other goodies. I just found out that there is now something called grunge paper, which is thinner than grunge board and I can cut it with punches and Spellbinders Nesties! So I went on a search to see how people were using it and got some fabbie ideas from the Studio 490 blog. I rolled all of this "research" into this one project!

I have been wanting to make this perpetual birthday list for a while now. I found the sheets for the inside online at some point in time - don't ask me where as I cannot remember! I had printed them and was just waiting for inspiration to strike! It finally did! Check it out!

I used the clear cover of a Long Haul album - which is 4x9 inches. Then I cut a chipboard sheet from a Big Boy album down to 4x9 to be my back cover. I lined up the holes for everything and punched all the layers with my Crop-a-Dile.

I used some Bo Bunny papers for the covers. For the front cover, I cut the paper a bit smaller than the acrylic so you can see the acrylic edge. Then I distressed the edges of the paper for that "grunge" feel. The title is something I printed on the computer. Then I cut it out with Spellbinder circles and inked it with some distress ink.

All of the flowers are grunge paper cut with Nesties or Sizzix dies, then inked with distress ink and over stamped with background stamps and Staz-On ink. The flourish is grunge board, also inked and stamped.

I added some vintage and sparkly brads and jewels for some pizazz. Inside the book are 12 sheets, one for each month. Here is the June sheet. There is a space to write names for each day of the month - to record birthdays. This is handy to sit on your desk or on a shelf. No more missed birthdays!

Supplies:
Paper: Bo Bunny
Stamps: Stampin' Up, PSK, Penny Black
Ink: Distress ink (spiced marmalade, dried marigold, shabby shutters, peeled paint, fired brick, worn lipstick), Staz-On (jet black)
Brads: Basic Grey, K&Company, Bazzill
Dies: Sizzix, Spellbinders
Birthday pages: downloaded from the Internet

See ya next month!

- Gloria

Friday, October 23, 2009

Tricks and Treats

I am loving the holiday theme on the MOSD blog this month! I created this Halloween wall hanging using the largest and the smallest pages from the Clearly Designed Steps acrylic book. I secured the two pages together with ribbon scraps, which I tied through the existing holes.


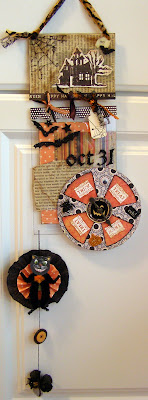
For the top section, the smallest acrylic page was altered with crackle paint and brown Staz On ink. I stamped the spider web using black Staz On ink, adhered vintage paper to the back, and added the spooky house cut out and sparkly bat.


On the bottom section, I layered patterned paper to the underside of the acrylic page and added glittered stickers on the front.

The focus of the hanging is the Trick or Treat spinner. I created this using a spinner template from MOSD, which I covered in patterned paper and added embellishments and a Tim Holtz game spinner to the center.


Dangling from the bottom of the entire hanging is a rosette that I made with a vintage-style cat ornament (purchased from ebay), a couple of black and orange buttons, and a black flower. I just couldn't stop embellishing! Overall, the entire hanging is about 2 feet in length.


Thanks for looking! I hope you can scare up some fun projects for your Halloween treats this year.

~Erica

Thursday, October 22, 2009

Gobble Gobble!

Hello Everyone! It's Naureen with a fun Thanksgiving project. Well Thanksgiving is approaching quickly and I am starting to get organized, because I have lots of family coming to town. One of the things I love to do for my family is make place cards for the table. Usually I try to make some sort of turkey and this year I made a cute and fun turkey using the MOSD shaped cardstock pages. This was a really fun and easy project to do. This turkey is my prototype per say, but I hope to make a few more using some of the other shaped pages.

I usually don't measure when doing projects but here are some briefy directiosn to help you create your own turkey.


Supplies:

  • MOSD Shaped Cardstock Pages (Scallop)

  • 5 Sheets of Fall Colored Cardstock

  • Brown Paint

  • Glimmer Mist

  • Brown Ink

  • Circle Cutter

  • Scissors

  • Rhinestones

  • Adhesive

Directions:

  1. First you need to pain the scalloped cardstock brown and spray with Glimmer Mist.

  2. After the Glimmer Mist has tried, fold the scallop in half.

  3. Cut the turkey's body using a circle cutter. The body is 3 1/2 inches and the head is 1 1/2 inches. Ink the edges.

  4. For the feathers cut 4 1/2 x 3 1/2 inch squares. Flod in half and freehand cut the feather shape. Ink the edges and the fold.

  5. Glue the circles to the scallop one on top of the other.

  6. Glue the feathers behind the circles.

  7. To clean up the back and make it look neat, I cut another circle and place it over the feathers in the back of the turkey.

  8. Glue on rhinestones for the eyes.

  9. Cut a small heart for the mouth.

  10. You may write your names on or die cut the letters.

Wednesday, October 21, 2009

Quick and Easy Halloween Card

Every year October seems to be one of the craziest months of the year for our family. Soccer and football are wrapping up, my son turned 9 on the 19th (Happy Birthday Parker!) and there are Halloween activities galore in our town. In honor of that, I made this quick and easy Halloween card. Any busy Mom (or Dad) can easily whip this up between supper dishes and soccer practice :-)

I started with two chipboard pieces from the Perfectly Shaped Concave Build-A-Book Set. I used my Scor-It to create a crease on both pieces and added glittered brads 1/2 inch apart on the card edge to create the card base. I cut a piece of patterned Halloween paper slightly smaller than the card shape and adhered. A fuzzy Boo Halloween sticker, a bling ghost and one more glittered brad complete the card. Super easy!


Saturday, October 17, 2009

Build a Book Boo House

Halloween- it's one of my favorite times of the year. All the cute little kids dressed up trying their darndest to be spooky! Oh, and the decorations!! We try our hardest every year to decorate our house spooky and we fail every year. I guess I am one of those that lean more towards the cute side of Halloween as opposed to the spooky side. For my MOSD project this month I started out building a "spook" house. Needless to say it ended up being a 'boo' house, and I am happy with that!!


The entire house was made up of MOSD perfectly shaped build a book shapes! I used 2 home plate shapes, 6 square shapes, and 4 skinny rectangle shapes and built myself a house! I also used the leftover acrylic pages from the Clearly Designed Flipped Out Acrylic Album from my project last month for the windows!


You wouldn't believe how easy it is to cut down those acrylic pages to any size you want! I just used a pair of sturdy scissors and it cut right through! I love how durable the acrylic is as well as versatile!

These Chipboard build a book perfectly shaped pages are just wonderful! The possibilities are truly endless as what you could do with them! I mean serioulsy...I just built a house!! And it's amazing how sturdy this little house is!

This year I started out small with the Boo house so that each year I can add just a little bit to it! I think that will add a little fun to the project!

As always thank you all for stopping by the MOSD blog to check out what I have created this month! Make sure to keep checking back to see what else the amazing DT has been working on! The talent here never fails to amaze me! I hope you all have a beautiful Holiday and I look forward to seeing you back here next month!

PeaceOut-ScrapOn-LoveAlways

Amy

Thursday, October 15, 2009

Happy Birthday Charlotte's Web!

Hi everyone! It is October and Fall is in the air!! I'm happy to be back with another awesome project using all of the great MOSD products!
My project reflects the theme of Obscure Holidays that some of us did for the month of October. One of the obscure holidays that falls on the 15th is Charlotte's Web Birthday 1952. There are about five other holidays, but I chose this one because October is the month for Halloween too.


To celebrate this holiday I created a birthday card. It's an interactive birthday card using all of these great MOSD products. For the base of the card I used one of the Perfectly Shaped Chipboard Shapes. I chose this shape because it looked like a spider web. I covered it with spider web patterned paper and then I glued a piece of peach cardstock to the middle of the card. I placed the sentiment on the cardstock. Next I took a piece of Clearly Designed Acrylic and placed that on top of the cardstock. I adhered the acrylic piece with a single orange eyelet. Then I glued a big flower to the middle of the acrylic. The final step was stamping the black spiders on the acrylic piece and the middle of the flower.


I love creating interactive projects! So the message can be written on the cardstock, all you have to do is move the acrylic piece up or down, write your message, and then move it back into place!!

I hope that you all enjoyed this project! Please come back often and take a look at all of the projects that the MOD SQUAD has to offer! There is always an awesome project here. Oh and check out all of the design team blogs!! Don't forget to check the MOSD website often for all of the new products and for a list of retailers so you can get these great products too!!

Have an awesome day! See ya next month!! :)


Tuesday, October 13, 2009

Happy Columbus Day!

Hello everybody!! Vicki here! This month we are in an attempt to celebrate "obscure" or even some not so obscure holidays!

So Christopher Columbus discovered America! I discovered ORGANIZATION...or rather, my lack thereof! So I created this project:


(I apologize for the photo - I will just say that acrylic is not easy to photograph....)

I used the coversets for the Big Boy albums to make each person their own "space". Each person can leave their own message for whomever, simply by writing on that person's board!

The artwork at each end is done digitally and I have each one saved....here is a copy of mine so you can see it:


Now this one was created at a size of 11 x 4.25 - half a sheet of 8.5 x 11 paper. You could just as easily use regular scrapbook paper and your die cutting machine to create and obviously embellish anyway you want.

Believe it or not - my nameplates are only held on with regular scotch tape! I did this so that I could easily change them. This one is relatively generic, but you can change at holidays or seasons, because they will change out that easy. My other thought was to just die cut letters and adhere them permanently straight onto the acrylic coversets! I also intend to ribbon the rings in between each board, however, I was not planning ahead (BAD VICKI!!) so it wasn't all color coordinated! It will be next time...maybe in December I can show you my Christmas version!

And that's all for me....now go DISCOVER some organization of your own!

Sunday, October 11, 2009

Happy Thanksgiving From Canada

We are celebrating thanksgiving in Canada this weekend and so I decided to make a Thanksgiving Card. I used the MOSD scallop chipboards. Before pasting my PP to the chipboard I used an x-acto knife and lightly cut a line so I could fold my card. I then decorated my chipboard with PP and ribbon and alpha mini's. I used adhesive to bound the front and back of the card.

Happy Thanksgiving!!!


Friday, October 9, 2009

Getting the most out of your build a book..


What does the fall season bring into your life, for me it's the beginning of changes. First it's school then like the trees we also have changes it may not be the color changing but ours are from dance school to guitar lessons what ever that may be for you. So I have decided that I would incorporate and share one of the changes in my home. My 4 yr. old just started dance school, and that is a big change not only for her but for us. My first thought was I have to take tons of photos so I can create a mini album, but then I took the one good photo and thought OMG this has to be on its own but how?

So even though I enjoy creating mini albums, and being able to choose one style or combining from the different build a books is pretty exciting. Today I wanted to use just one sheet of MOSD square scallop on a layout. I knew this would be easy peasy as the MOSD chipboard is so easy to use. I covered the MOSD Build a Book with Pattern Paper and used it as my matting for my photo. I added some stickles to give it some glitz and viola a new use for using the MOSD Build a book. I also used a Stick Ons Picto Grams to bring my layout together with the photo. I thought it was perfect for my daughters first week of dance.

Thursday, October 8, 2009

Double Duty Note Pad


So I took my
Perfectly Shaped Build a Book
Mini Scallop piece by
MOSD
and sliced away!
I love using these pieces for mini albums!
They work perfectly for all sorts of little books!
*
But I also enjoy thinking outside my box
so I like to take my Build a Book pieces
and play around a bit
just to see what I can come up with
other than a mini album.
*
Today's Build a Book piece
delivers the cutest little note pad cover,
don't you think?!
*

The first photo shows how it looks without its band.
(I used a brown hairband... inexpensive and pretty too!)
Wouldn't this look adorable sitting on a desk?!
*
And the photo above shows the note pad
WITH the band in place.
Pop it into the purse and you are ready
to brag as well as take notes! LOL
*
You will see below just how I trimmed my
Mini Scallop Piece
to create my note pad cover.
The cover folds around the top of the note pad
and down about halfway of the back.
Then I covered the back
completely with a 3x3 piece of
Chocolate Chip card stock.
*
Check back soon to see what I come up with
using the remaining pieces of my
Perfectly Shaped Build a Book pieces.
*

Wednesday, October 7, 2009

One of my favorite holidays...

...is Halloween!!! As a child my parents always decked out the entire house with ghoulish decorations! We made a grave yard in the front yard, inside was all decked out like a haunted house and Halloween dinner was always "wicked" looking! And we made it a point to go to a couple haunted houses during October as well! Now that my little ones are starting to get a little older they are REALLY wanting to decorate for Halloween and are attracted to all the spooky decorations! So I have been trying to make fun spooky decorations to put up in our house. And I had a batty time making this for my house! I used the Midnight Oil Clearly Designed Square album piece with some coordinating pattern paper, Heidi Swapp bling, pom pom trim and this cute digital image from Cheeky Radish Designs colored with Copic markers.


Then I had fun making an acrylic Halloween card-its SOOO cute I don't want to share it! I used the Midnight Oil Clearly Designed Step album and took 2 pages to use as my card, the front one being shorter than the back. I used some pattern paper as the background, Making Memories glittered mini letters, DoodleBug ric rac and this cute monster shaped card from Paper Popsicles. For the monster I used flocking to make him furry, alcohol ink to make him green, Distressed Stickles for his legs and added wiggly eyes and stitched a mouth. It was so easy to use a Crop a dile Big Bite to make the holes and tie the two pages together to make this card!

Its amazing how versatile the Midnight Oil products really are! I find myself reaching for album pieces ALL the time to create some new and fun things! So make sure to go and get yourself some Midnight Oil products and start thinking outside the box to find new uses!

Happy October and thanks for looking!

Till Next Month

Valerie

Saturday, October 3, 2009

Happy October!

I love Halloween & I am a sure sucker for all of the Halloween lines!

Here is a mini book using some Halloween photos from last year. My pages are from MOSD's perfectly shaped build-a-book line! While mine are all 6x6 square, there are many fun shapes to mix & match! I punched holes through the chipboard & used the spiral rings to keep the mini book together.


Thanks for stopping by the MOSD blog - Hope your Halloween is a frightful one! ;)