Monday, August 31, 2009

Can I Get You a Coffee?

I love the smell off coffee. I love the idea of coffee. But I don't like the taste of coffee. And I live where there is a Starbucks every 50 feet! I only like coffee if it's got a lot of milk and sugar and whipped cream and chocolate in it. I know. That's not "really" coffee. I love Peppermint Mocha or velvety hot chocolate with a hint of coffee flavor or a creamy caramel flavored coffee. You get the idea. My husband calls it "sissy coffee."

Anyway, I had the idea of doing a recipe album (but I don't cook), and I wanted to do something "fun." While I was thinking on it I saw some Starbucks "hot sleeves" on my desk that someone gave me because they thought I "could make something out of them." And it hit me! I could make a Coffee Recipe Album! Ta-da!

I grabbed a MOSD Cover 2 Cover Show-Off Album and got to work! The Show-Off is 4x6 with 2 clear covers and 4 chipboard pages. The perfect size for my little album! I also have a cookbook called 1001 Chocolate Recipes or something like that. And I was off and running!

I stamped my clear covers with Timber Brown Staz-On ink to simulate "coffee stains" and then inked the edges of the acrylic to make them stand out. Then I attached a coffee sleeve to the front for decor.
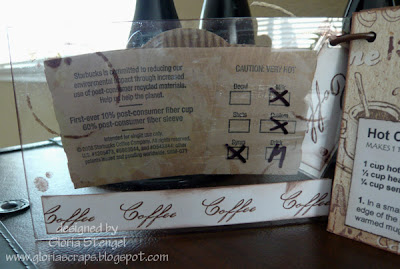
The back of the hot sleeve shows through the acrylic for a whimsical effect. I used Flair Designs paper for the background of my recipes.

I typed up the recipes on the computer and added some clip art and stamped images for decoration. Very simple and fast to pull together.

I colored a few of the images with colored pencil to make them pop off the page.


I used a few stamps to make "coffee stains" on the paper as well. I used Stampin' Up, Colorbox Chalk, and Versacolor ink. The Versacolor ink is called Java! How funny!

I found great clip art on Microsoft Word.

After I finished the album, I punched a hole in one corner and bound it with a MOSD brown plastic ring. I decorated the ring with ribbons and a spoon "tag charm."

I hope you enjoyed looking at my little recipe album! Have a cup of joe on me!

- Gloria

Saturday, August 29, 2009

EssenseVibez in the Houseeeeeeee---coming to you with my project for the month of August—Okay first lemme tell you this, MIDNIGHT OIL has THE most fantastikal products ever!---When I received my box and opened it I was like whoaaaaaa, I thought it was Christmas in July!!!—And you wouldn’t believe the products MIDNIGHT OIL has to offer you to create your scrapbooking projects with—can we say “deliciousness in the making!”


I’d like to introduce you to my PRAISE book I created using a couple panels from the Clearly Designed Show Off package—i punched a couple of holes on the front and back covers—I then painted the edges to give it that softness I was looking for—You will also see the MOSD flowers on the front cover of the book {cuteness}—And lemme tell you about their rings—they're plastic and so simple to use, no fuss whatsoever—You just slide them on and you’re done--


If you look closely at the envelopes I spray inked and painted, you will see some MOSD slides which I added rubons to—so easy to do!—Also, on the inside of the envelopes is a place for me to journal my thoughts—Writing does the mind good!—i had a great time going through my stash of goodies to create this book—


If you'd like to see the completed book, click here


now, if you’re interested in any of the MOSD products {which I know you are} go to the link located on the left sidebar and take a look at what they have to offer---oh yeah, and if you liked my book please leave a comment and tell me what you think—thank you for coming to our blog and please enjoy our design team members creations as we venture “to infinity and beyond” on our MOSD journey---remain blessed!!!

Wednesday, August 26, 2009

Aunt x 5

First let me say how excited I am to be posting my first project for MOSD! This gave me the push I needed to make my first mini album ever! At first I was really nervous because thinking outside of a 12 x 12 page isn't easy. The hardest part on mini books is having to cut your pages and making sure that they all match. What's wonderful about the chipboard precuts is you don't have to worry about that.

For my covers I used the precut acrylic and i used acrylic paint around the edges. I was worried that over time the paint could easily chip away so I went over it with glossy accents. I then decorated it with flowers and bling.

I am an Aunt to 5 wonderful nieces and nephews so I used 1 page both sides to showcase each one. What I loved about this chipboard is the half circle edge so I used it to put each of their names. TFL!


Tuesday, August 25, 2009

How About a ittle Something...

Summer! (Because I DON'T want it to ever end!!! )


And Something Fall! {Because unfortunately its a few short weeks away! : ( }


So my summer project is a tag to put on you child with info in case they should get lost from you while at the pool or even any place they could get separated from you. I used the covers from the Petite Album to make the tag, I used Copic Markers to Color the Digital stamp from Cheeky Radish and on the back used DoodleBug run-ons to put the info. I glued it together with Zip Dry glue and there you have a quick and simple tag! One bit of advice though only glue one side at a time and make sure the glue is dry before you do the other side! OOPS!! The paper I used for this was Bella Blvd.


Next up for the Fall banner I used the Perfectly shaped home plate album, October Afternoon Home Town pp, Cheeky Radish digital image colored with Copic markers, stickles, Shimmerz, May Arts ribbon, DoodleBug rub-ons and some leaves I had received in a kit last year. Now I only needed 1 double sided piece of paper to cover the home plate pages I used both sides of 1 sheet and even had some paper left! I attached the paper to the pages with Zip Dry glue, finished the edges with Chocolate Shimmerz, then used my Cricut to cut out the letters out of 1 more piece of paper. I outlined the letters with Distressed Stickles. I cut a few pieces out of one more pieces of patterned paper and used the leaves to embellish the sign. I then used a small hole punch and lined up the pages to cut the holes and strung it all together with some ribbon. I now have this cute sign that can be hung on a door or in the house for Fall! ***One tip if you plan to have the sign used outside I would coat the sign with Mod Podge to protect the paper from the elements.
I hope you enjoyed these projects and I inspired you to grab some Midnight Oil products and create!
Have Fun!
TFL!
Valerie

Monday, August 24, 2009

Back from a much needed Scrappin' Weekend:)

Hello All:) Lori, Frugal Scrapper Extraordinaire here:) Whoo Hoo!

I'm SOOOO excited to share my first MOSD project with you all! I spent an awesome weekend at a Scrappin' event with fellow scrappin' committee members for a charity crop. I had a blast working with my MOSD products and couldn't wait to share these cards with you.

I made quite a few cards and these are a few of my favorites. I had a blast using the MOSD Slides. Using Staz On ink, I spruced them up with some stamps from my stash and added some MOSD ribbon (pink polk-a-dot and aqua). I also added some awesome MOSD flowers to the pink card.

I used scraps of pp from my stash (Basic Grey, My Mind's EYE) along with some Bazzill cardstock. Of course I had to paint the edges and used my Ranger Paint Dabbers to do that. The stamps I used are also from my stash.

In addition, the original project I made for this post is an acrylic/chipboard MOSD mini album.

After using Alcohol Inks on the acrylic cover, I then used Ranger Archival Ink with a swirl stamp to make the "resist" affect. When you use the Archival Ink over Alcohol Inks, you just need to wipe the archival ink away before it drys to get this effect.

The entire album can be viewed by clicking here.

Enjoy:)

Now off to create my next MOSD project...whoo hoo!

Lori McCausland
Frugal Scrapper Extraordinaire and Proud MOSD Design Team Member

Saturday, August 22, 2009

No your eyes aren't tricking you.....

this post is a day late......in my back to school whirlwind....my brain had momentarily failed me.....but never fear....I (thanks to a good friend) have appeared in the virtual world to share this project with you!


I used the Clearly Designed Show Off and punched some holes, I also utilized our cool Intricacies too -- you'll find the 1-2-3 and Stars Intricacies peeking out at you....and some of the techniques I used for the acrylic were painting the back solid so the intricacies popped, filling in between with some glitter, inked, painted around the edges....and speaking of the intricacies, you'll see that I outlined them so that they stood out too....and check out the way I stuck those Journal Bits in there too -- backing them with paper so they popped too. Thanks for letting me share with you!

<3, Shannon

Wednesday, August 19, 2009

Happy Wednesday everyone, it's Carolyn here!

Today I am going to share a calendar I made using MOSD's Clearly Designed Easel Album. You get, 2 - 5 X 7 covers/stands and 4 - 4 X 6 inner pages, so if you want additional pages, be sure to get the Clearly Designed Easel Refill Pages. This acrylic book is perfect for desk calendars since it can be easily displayed on your desk top.


If you have any projects you created using the MOSD's Clearly Designed Easel Album, I'd love to see them! Please post a link to your project in the comments!

Thanks for stopping by the MOSD blog - have a great day!

Monday, August 17, 2009

Forever Build a Book

Hello beautiful people! It's Amy here, and today I have a special mini album to share with you. This album is very dear to my heart as I made it to send to my DH who is currently deployed. I just wanted to give him something to look at as a reminder of the love that he has supporting him back home!

On this album I used the fabulous MOSD Build a Book Perfectly Shaped Postage Stamp for the base of the entire book. I just love these Build a Book shapes, they are so versatile and FUN! To adhear my paper I used a spray adhesive which was fast and simple and gave me flawless results. For front title of the book I used a MOSD Monogram from the Stacker Friendship Collection. I added some Glossy Accents to the Forever Monogram to give it a little extra 'pop'. To hold the entire album together I chose to use MOSD Spiral Rings in clear. These rings are amazing!! I just added some ribbon and voila - there ya go!


Thank you all so much for stopping by today! Make sure to keep checking back to see what the rest of the Design Team is up to!

PeaceOut-ScrapOn-LoveAlways

Amy